Wednesday, November 18, 2015

Top Best Three Android Contacts Apps for Managing Your Contacts / Address Book

With more and more functions such as video-playing, video-recording, game playing etc added in the smart phones, it’s easy to forget that your MP3-playing, book reading, web browsing Android phone or tablet is still a cell phone that was originally designed to make phone calls and communicate with your friends and family. Your smartphone manages tons of contacts from your email accounts and social networks, and you may need to sort different contacts into different groups.. Some of the top address book replacement apps for when your built-in contacts app or dialer just doesn’t cut it will be introduced in this post.

1. Contacts+ – Free with In-app Purchases

Contacts+ is a well-designed contact app for Android users. This app comes with one of the best looking and user-friendly interfaces. This good looking app also has a very gracious user experience and lets you do everything in a matter of seconds. Contacts+ employs a fantastic way or sorting contacts and groups. Your contacts list is sorted alphabetically by default, but with a twist; the top 10 contacts or so that you frequently talk to will be listed above everyone else. This makes it very quick to find and text your friends, family, and whoever else you talk to most often. Contacts+ can also alert you about upcoming birthdays and it is one of the few apps that are compatible with Android Wear watches.
In-app Purchases: $1.00 – $49.99 per item
Features:
  • Comes with a call log, messenger and dialer.
  • There are two distinct themes available.
  • Favorite contacts are displayed on the main screen.
Notable Feature:
Facebook, Twitter, LinkedIn, Foursquare and Whatsapp are integrated. You can get all the contact options at one place under one name. The app does it all automatically so no need to manually fiddle with contacts.

2. ExDialer – Free Version and Paid Version ($3.99)


The app comes with a very small size and also features a pretty robust theme system. It also never runs in the background so no strange battery drains are to be found. The default theme looks fantastic and could easily pass for a stock Google dialer.
Another very useful feature for power users is integrated VoIP calling. If you like to use the internet to make your calls instead of a carrier’s voice plan, you can use ExDialer to manage your calls through several different providers, including Skype, Viber, Fring, and several others. On top of that, you’ll still get over 30 different languages to use.
Features:
  • A wonderful and intuitive dialer.
  • Storing contacts is very simple.
  • Multiple themes are available on the Play Store.
  • The free version is actually a never-ending 7 day trial. This means the app will ask you to purchase the paid version but will let you use the functionality indefinitely.
Notable Feature:
You can press the “#” key to perform a phone number search right from the dialer.

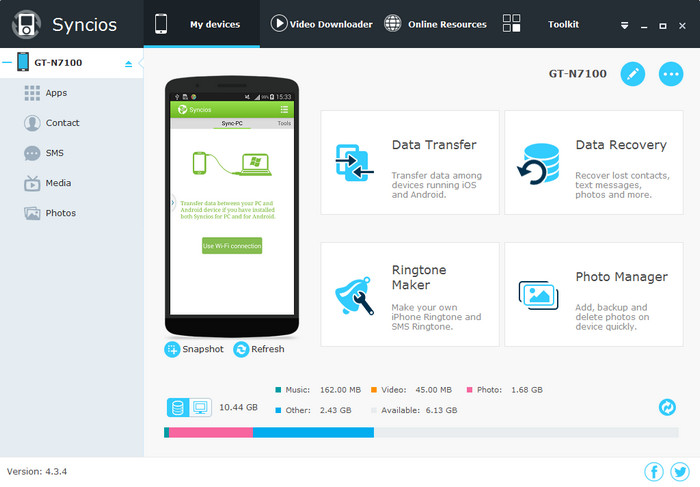
3. Syncios Android Contacts Manager : Free

“-Since I got hundreds of contacts on my Samsung Galaxy phone, it is hardy to organize and edit them on smartphone with small screen. I would like to be able to easily see and edit/manage my contacts on my computer and sync them to/from my Android (two-way sync). It is possible?”
If you are an Android user, you might be experiencing the same concern. Given this situation, you can use applications like Syncios Android Managerto easily backup, restore, delete and create your contacts from PC. This contact manager offers varying features, simply download it and follow the following steps to manage your phone contacts on PC.

Add and edit Android contacts from PC

In your Android device directory tree, click “contacts”. All contacts show up in the contact window. Click “New” to add a new contact. In the pop-up window, you are able to add name, phone number, email address, home address, set a special date, like birthday, and more.
If you would like to edit existing contact, select a item and click “Edit” from right panel, then you can edit it in the same way.

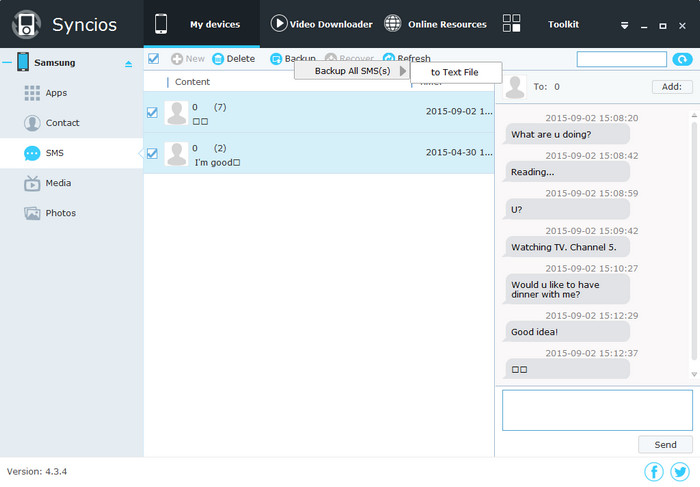
Backup & Restore Android Contacts

Click Start Download button, those videos will be saved on computer first then transferred to your deivce. You are able to select or change the saving path.

Delete Android contacts in batch or selectively

To delete several contacts on Android phone at a time could be troublesome. However, with this Android Contacts Manager, you are able to delete selective contacts or all contacts on one mouse click. Select the contacts you’re going to delete. Click “Delete”.
Features:
  • A powerful contacts manager for Android and iOS.
  • Backup and restore Android & iOS contacts quickly and safely.
  • Edit contacts information such as phone number, email address easily.
  • Delete Android contacts in bulk or selectively.
  • Support backing up contacts as a .txt file.
Notable Feature:
This Syncios Contacts Manager is an all-in-one data management for iOS and Android. Beside contacts, you can also manage your photos, videos, music, books on the Android or iPhone, iPad, iPod.
_________________________________________________________________

Read more:


Monday, November 16, 2015

Rooting Android - How to Root Android Phone and Tablet ?

Rooting an Android phone allows Android users to boost their handset's performance, install non-approved applications, expand internal storage and block advertisements. Inexperienced users, however, are likely to "brick" their phones (make them useless by modifying them incorrectly) if they try the rooting their Android phone or tablet without following proper instructions.


Tips and Warnings

tips for rooting
• Advantages & Risks:Familiarize yourself with the instructions before attempting to root your phone. Doing a "dry run" is a great way to guard against bricking your Android phone. You can go our previous article to learn advantages & risks of rooting Android.
• Necessity: Rooting has become less necessary over the years, but it’s still necessary if you want to run certain types of apps. You get to choose which apps get root permissions and which don’t.
tips for rooting
• Backup before rooting: Backup! Backup! Backup! It really can’t be emphasized enough. The rooting process could erase all of your phone content and setting, make it totally a new phone. Data loss on your phone could cost a lot, so make sure all of your phone data was baked up successfully, such as contacts, sms, videos, photos, music, apps, notes, calendars, call logs, etc.
How to backup iPhone before rooting:
  • Install Syncios Data Transfer and connect your iPhone to PC.
  • Launch this powerful iOS backup tool and click on "Backup" button on the homepage.
  • Select data to backup to computer.
  • Tag on " Start Copy" button.

How to Root Your Android Phone or Tablet?

Before getting started, it is important to charge your phone, preferably with 100% capacity of the battery. Then, follow these steps to root your Android device using Kingo Root:
Step 1: Download and install Kingo Android Root which is a free one-click Android root software . Double click the desktop icon to launch it.

Step 2: Connect your Android device into your computer via USB cable. Don't forget to enable USB Debugging mode on your Android device.
Step 3: Read notifications carefully and click "ROOT" to start the process. During rooting, please do not touch, move, unplug or perform any operation on your device. The process will take a while, please be patient.
Step 4: After completed, click "Finish" to reboot your device. Until your device reboots itself, do not operate. Normally, you will find an app named "SuperUser" installed on your device after successful rooting.
You can go here to see whether your device is supported by Kingo Root. However there many alternatives for rooting Android that you can have a try, such as Towelroot, Cyanogen Recovery Flasher etc.

Don't forget to restore your Android after rooting

How to restore Android after rooting:
  • Again, launch Syncios data Transfer to restore rooted Android.
  • Connect your Android phone or tablets to pc and click on "Restore" button on the homepage.
  • Select data to restore to Android.
  • Tag on " Start Copy" button.


Monday, November 2, 2015

How to backup messages from Android to conputer?

Since everything is gradually becoming digital, owing to remarkable progress in the technological field all over the world, losing even one minute piece of information from your phone can be a matter of life and death. In this tutorial, you will see step by step guide on how to transfer or sync messages from Android phone to computer (Windows xp/7/8/10 ).
The following tutorial is available for all Android devices, such as Google, HTC, Samsung, Huawei, Motorola, LG, ZTE, Xiaomi, and more...

Step by Step Guide to Backup Android Messages to PC

1. Install and launch Android Manager and connect your phone to computer.

Since it is not able to backup messages to computer via USB cable directly, we are going to transfer data to computer with the help of a professional Android Manager - Syncios Android Manager. Simply install and run this Android assistant on your computer, and connect your phone to PC using USB cable. The program will detect your device automatically, and show phone info on the homepage.


2. Select message(s) to backup to computer

To backup message(s), click My deivces on the top menu bar then select SMS on the left column. All of messages on your Android phone will be listed on desktop. You can choose selective messages to preview and backup, or transfer all messages to backup at one time. Tag on Backup > "Backup All SMS" > "to text file".


3. Choose your backup path

For your convenience, this Android backup assistant enables you to select path you would like your messages saved. The dialog will pop out while clicking backup button. After decided, click Backup.
That's it! now you messages was synced to your computer. If you would like to one click backup everything on your Android device or restore messages to Android, please see here.

Syncios Android to PC Transfer - Transfer Pictures from Android Phone to PC

Like travelling and  taking lots of photos with your Android phone/tablet to keep track of those gorgeous scenery and moment.  But it will not be safe to keep photos on Android phone, they may get lost due to various reasons: you may delete them accidently or get your Android phone lost/damaged. It’s a great idea to backup photos on Android phone before those things happen.
This article will show you how to transfer and backup pictures from Android to PC easily.

Method 1. Transfer Pictures on Android to PC with a USB Cable Manually

If you don't like to use any Android backup tool to transfer pictures from Android to the computer, here is the way for you.
Step 1. Plug your Android phone into the computer with a USB cable. Now, your Android phone is acted as an external hard drive.
Step 2. Find the external hard drive for your Android phone on your computer and open it.
Step 3. Find picture folders you need.
Normally, the camera pictures are stored in DCIM folder. Photos imported from computer are saved in a folder named Photos or others. If those pictures are downloaded or taken by other apps, you need go to these folders to find these photos.
Step 4. Transfer Android camera photos and others to your computer.
Once the folders are found, just open it copy one by one and copy your desired ones. Then, transfer Android camera photos and others to your computer.

Method 2. Backup Android Photos to Computer with Syncios Free Android Backup Tool

Feel it tricky to backup android to computer via USB. Take it easy. There’re many useful tools to back up Android photos. Syncios Android Manager is one of them, which provides an easier way to transfer your Android pictures to PC.

Top Features for Syncios Free Android Backup Tool:

  • Transfer Android mobile data: Music, videos, photos, contacts etc.
  • Download videos from 100+ video sharing sites up to 4K HD video quality and transfer to Android.
  • Massive free resources: videos, wallpapers, ringtones.
  • Handy toolkit: Audio converter, video converter, ringtone maker, etc.Download Syncios ANdroid Manager

1.Run this Android backup tool and get your phone connected

To get started, install and run the Syncios free Android Manager on your computer, and plug your Android phone into computer, you can also try WiFi connection.
After your Android Phone got connected, it will be shown in the primary window with photos and more files categorized in the left panel.
Note: you are also able to use WiFi connection.

2.Selectively backup photos on Android phone

To backup Android phone photo to Windows PC, click Photos tab on the left panel of Syncios, you'll see all the photos on your device,
click Camera or Library on the right panel of the program to select the photos you need to transfer to PC, and then press "Export" option.
Now, you could successfully transfer photos from Android to your computer.

2.1 to Android 5.1.1


Supported OS: Android 
Supported Android  Samsung; Sony; Huawei; Xiaomi; Motorola; Nubia; Meizu; Vivo; LG; lenovo; Nexus; HTC; Vivo; Oppo, etc
Supported Backup Files: contacts, messages, apps, music, videos, photos.